HomeGuard™ Monitoring System Field Manual
Installation Materials
Every installer requires these products for a successful installation and use of product:
1. A high torque electric drill with charger or similar substitute drill.
2. 1 standard 3” dirt Auger.
3. Standard HomeGuard™ Monitoring Stations.
4. Standard graph paper with activity station log sheets
5. HomeGuard™ Bait Matrix Replacement Cartridges
6. HomeGuard™ Truth Termite Bait replacement cartridges or any standard E.P.A registered chemical bait matrix.
7. Rubber gloves
Optional Items:
8. Standard hand trowel
9. 2 gallons of Non-chlorinated water
Installation Procedures
A certified termite prevention employee with a current state identification card is mandatory.
Gloves are required to keep human smell off bait matrix.
Step 1: Plan system placement. Place stations in desired spots around the perimeter of the house. The stations must sit 2-3 feet away from exterior perimeter wall and/or appendages such as patios, sidewalk, pools, etc. AND each station should sit approximately 10-20 feet apart. Remember to keep stations accessible for future visits. We recommend starting by garage and traveling around the home ending at the other side of the garage.
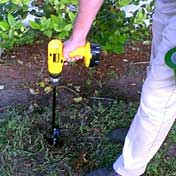
Step 2: Drilling the station’s hole. Attach Auger drill bit to cordless drill and check. Proper installation requires pest professional to drill a minimum of a 5 1/2-inch deep hole to a maximum of an 6-inch deep hole. If over drilling occurs, then refill with dirt to the desired level without firmly packing the dirt at the base. Ensure that all debris such as leaves; chips, branches or roots are removed from hole. Excess grass may need to be removed from the area surrounding the hole, so that the trap may sit, flush to the dirt.
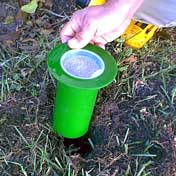
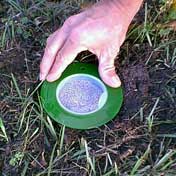
Step 3: Inserting the HomeGuard™ Monitoring Station. The HomeGuard™ Monitoring Station is a self-enclosed single process station. The stations come pre-assembled, requiring the operator only a few steps for proper installation. At this point 2 to 3 ounces of Non-chlorinated water may be added to the base of the borehole to lower temperature. Place the open end of the station (further known as “bottom”) inside the properly drilled hole. Ensure that the station is level and that the top of the station rests firmly to the ground. The excess dirt extracted from drilling can be used to refill any air gaps around the outside circumference of the station. Repack tightly in order to prevent wash out and maintain the stability of the station.
Step 4: Expedite lower temperature ( option ). Station top should now be removed. Pour 2 to 3 ounces of Non-chlorinated water into the top of the station, covering the entire horizontal surface, if possible, to expedite lowering the temperature. Then replace cap firmly on station.
Step 5: Install remaining stations. Repeat steps 2-4 when installing remaining stations remembering to stay within the 2-3 foot easement from the exterior structures and 10-20 feet apart from each station. Continuing labeling each station in sequential order.
Procedure for Checking Stations
The HomeGuard™ Monitoring System was designed to allow a trained professional to check the station without effecting or disturbing termite activity within the station.
1. Begin check at Station #1.
2. Look through the transparent top to determine if termite activity has occurred. Signs of activity include the following:
· Station’s interior matrix has sunken inside the cylinder.
· Station’s top cap shows signs of dirt or mud build up inside the station.
· Live termites are viewed inside the station.
· Bait matrix inside of station appears to tilt or lean to one side.
If these signs occur it is mandatory to remove the top lid of the station and check for activity by closer inspection.
If there is NO activity viewed in the station:
Visually check for matrix integrity.
If matrix needs to be replaced due to damage or erosion, “replaced bait matrix.”
Replacing Bait Matrix
HomeGuard™ Truth Termite Bait replacement cartridges are pre-manufactured and are installed as follows:
First, remove the top lid of bait station. Recheck to confirm there is no termite activity. If no activity is occurring, then remove the bait matrix by grabbing top and pulling upward. Take refill cartridge and place back inside station. At this time operator may choose to hasten temperature loss by adding 2-3 ounces of distilled water in bait matrix as previously described in “Installation Procedure” section in manual.
When activity is found in the station:
Important Note: The HomeGuard™ Truth Termite Bait or an E.P.A. registered chemical bait matrix, will only be applied when 2 or more stations are found active with termites at a given location. After activity is found in a station, the operator must determine the EXTENT of the termite activity level. If the station is only receiving “light” termite activity, meaning only the bottom quarter inch of the bait matrix is being activated, then leave the station alone, and recheck at the next visit.
If termite activity is heavier, The HomeGuard™ Truth Termite Bait or an E.P.A. registered chemical bait matrix, may be installed when 2 or more stations are found active . Refer to the HomeGuard™ Truth Termite Bait replacement cartridge's label for proper use.
If using another EPA registered chemical bait matrix, you must follow that products EPA label directions for use.
HomeGuard Distributors Inc.
12597 Ulmerton Rd.
Largo, Fl. 33774
EPA EST. NO. 75313 - FL- 001


HomeGuard Distributors Inc.
12597 Ulmerton Rd.
Largo, Fl. 33774
EPA EST. NO. 75313 - FL- 001
|